- Connect Access Point and Your Computer with Network Cable.
- Change Your Computer IP address in same subnet with Access Point.
- Now Open Browser and type Access Point IP. (Example: http://191.168.0.100). Where my computer IP Address is 192.168.0.101
- Enter Default Username: admin and Password: password
- Enter Access Point Name. Click Apply.

- Enter
Time Zone (Bangladesh), Enable Custom NTP Server and Add NTP Server IP (Example:1.1.1.1).
Click Apply.

- Click Wireless.
Edit SSID by External Guest. Click Apply. SSID will be broadcast to connect client with AP.

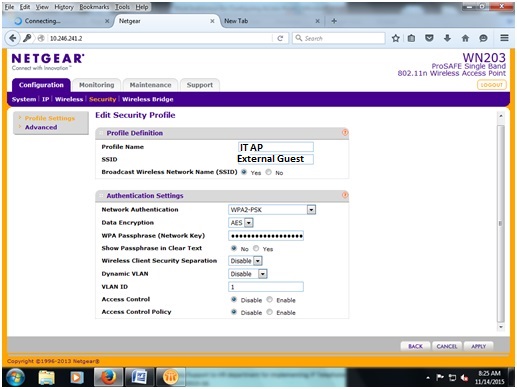
- Click Security. Click Edit.

- Set Profile
Name IT AP. Select Network Authentication WPA2 PSK. Set WPA Passphrase by password123.
Click Apply. Client connect AP with this WPA Passphrase key (password123).

- Click Maintenance.
Set Password. Change web console password.

- Click Configuration.
Click IP and Set IP address, Gateway and DNS. Click Apply.

Tuesday, August 16, 2016
Configure NETGEAR Access Point:


Subscribe to:
Post Comments (Atom)
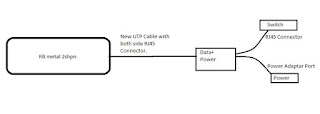
Configure rb metal 2shpn As Access Point
Turn On rb Metal 2shpn Router as like : Connect rb metal 2shpn with your Laptop by winbox. Open Winbox: Click on Neighbors you w...
-
 Connect Access Point and Your Computer with Network Cable. Change Your Computer IP address in same subnet with Access Point. Now Open B...
 -
Prevent Translating "conft"...domain server (255.255.255.255) or disable resolving Unknown/Invalid Command: During wo...
-
Switch> Switch>enable Switch#conf t Switch(config)#interface fastEthernet 0/1 Switch(config-if)#switchport mode acc...
This is such a great resource that you are providing and you give it away for free. I love seeing blog that understand the value. Im glad to have found this post as its such an interesting one! I am always on the lookout for quality posts and articles so i suppose im lucky to have found this! I hope you will be adding more in the future… for any kind of netgear support you can call us 0800-090-3240 or visit netgear phone number uk.
ReplyDeleteHi
ReplyDeleteThanks for sharing nice informative blogs.its a really helpful post for Netgear users.if your readers are using McAfee Antivirus and looking for experts advise . Call McAfee toll free number or visit www.mcafee.com/activate
ReplyDeleteNet gear customer service representative, we are able to handle criticisms, complaints and special requests from time to time and able to handle these queries as customer retention is vital for our company to survive. We provide the best third party services.
Net gear customer service representative, we are able to handle criticisms, complaints and special requests from time to time and able to handle these queries as customer retention is vital for our company to survive. We provide the best third party services.
ReplyDeleteHave you tried doing aComfast WiFi extender setupbut failed in getting the job done? We are sure after you have walked through this article, you will gain sufficient confidence that resolving the issue and setting up the extender will be piece of cake for you. So let’s get started!
ReplyDeleteHii, Thanks for share the info. Read more click on Netgear router WiFi working
ReplyDeleteIf you are also amongst them, then this piece of writing is specially written for you. Here, we will provide you with some of the topmost fixes following which troubleshooting “Wavlink WiFi extender causing signals to drop” issue will be a piece of cake for you. Let’s get started!
ReplyDeleteHere, we are going to provide you step-by-step instructions that will help you do Wavlink extender login in a flash. Let’s get the ball rolling!
ReplyDeleteIf the shark robot vacuum not charging, there could be an issue with the vacuum. Ensure the vacuum’s power switch is flipped on. The vacuum will not charge if the vacuum is off. Therefore, ensure to turn it on to charge the vacuum. Another reason could be the charging contacts on the vacuum are dirty. Ensure to clean the robot vacuum thoroughly every two weeks.
ReplyDeleteTo proceed with the Vivint camera Login you must install the Vivint app on your smartphone. Through the app, you can log into your account. If you don’t have an account, you can create one through the app. After logging in, you can add your Vivint camera to the app and set it up accurately. Just ensure to connect it to a stable WiFi network.
ReplyDeleteIf you want to know how to fix lexmark printer offline issue, you can do so easily. This issue arises when the printer doesn’t have a stable WiFi connection. Ensure to connect the printer to the WiFi through the user interface. If you are facing any issue, make sure you are entering the correct WiFi password to connect successfully. Also ensure your router is working fine as well.
ReplyDeleteIf the nest app not working , you must fix the issue. You can try uninstalling and installing the app again to fix any glitches. If this doesn’t work, you can check if an update is available. As an outdated version can also cause issues. If you are unable to log into the app, ensure you are using the correct login credentials. You cannot log in using the wrong password.
ReplyDeleteTo proceed with the Linksys velop reset, you must find the reset button on the Velop. Ensure the nodes are connected to the Velop. After that, press the reset button on the Velop and hold it. You can release the button when the LED on the Velop turns red and fades away slowly. Now, the reset is successful. Hereon, you can configure the Linksys Velop again accurately.
ReplyDeleteDo you want to access blazing-fast internet speed in every corner of your house? If yes, then doing Victony setup would be the best option.
ReplyDeleteThank you for sharing this informative article. I particularly liked how you explained in a simple and concise manner. It made it much easier for me to grasp. I have also share my post. Click on link if you have any query about Wavlink WiFi extender setup.
ReplyDeleteGreat post! If you are looking for a way to access the internet that isn’t just restricted to your room, then it is recommended that you perform Victony setup. Click the link for read more.
ReplyDeleteThank you for sharing this informative article. I have also share my post. In this article, we’ve mentioned a few tips that’ll help you troubleshoot your extender's issue without performing the Comfast WiFi extender reset
ReplyDelete. Click on link for read more.
Is your tplinkrepeater not able to connect to the wireless router? If the answer is yes, then first of all, don’t fret! A lot of TP-Link users face this issue. Click on the link to read more.
ReplyDeleteHere, we have talked about how to update the Rockspace firmware. Before starting, we need to perform the Rockspace extender setup process. Click on the link to read more.
ReplyDeleteYour post is very interesting to read. Thanks for sharing this information. You’re doing a great job. Keep it up.
ReplyDeleteI appreciate the effort you put into researching and writing this. Are you unable to complete the 192.168.10.1 WiFi repeater setup process due to this? Well then, you’ll need to read the troubleshooting tips highlighted in this guide.
ReplyDeleteThis comment has been removed by the author.
ReplyDeleteSuch a nice information and also your way of representation.
ReplyDeleteI share a some information reference
How to Set Up and Manage Guest Wi-Fi Network
Thanks for sharing your thoughts. I really appreciate your perspective on this topic.
ReplyDeleteThank you so much. Great work all around, keep sharing more informative content with us.
ReplyDeleteThanks a lot. Such an amazing content, keep sharing more informational blog in future.
ReplyDeleteThanks for this valuable blog post. Such an informational content, you have just gained a brand new reader.
ReplyDeleteThanks for sharing this article it was quite insightful.Hoping to see more articles.
ReplyDeleteNice Post
ReplyDelete